Thursday, December 3, 2009


Cobra Crimson Guard Urban Assault Strike Team Light Attack Tank continued..............


After the black camouflage had dried, I added silver details and then assembled the tank. Added stickers from the Hasbro sheet for the Armadillo along with Crimson Guard logos and silver Cobra symbols from cobrastickers.com and some custom home made ones for the Urban Assault logos.
Custom Cobra Crimson Guard Urban Assault Strike Team Light Attack Tank "recipe"
Entire Vehicle - G.I.Joe Armadillo Tank (2008 25th Anniversary Vehicle Sets, Wave 1 {Serpentor/Air Chariot and Steeler/Armadillo})
Paints used:
Krylon Fusion Satin Burgandy Spray Paint
Krylon Satin Black Interior/Exterior Acrylic Paint
Tamiya XF-1 (Flat Black)
Tamiya X-11 (Chrome Silver)


Wednesday, December 2, 2009


Cobra Crimson Guard Urban Assault Strike Team Light Attack Tank


This is the second of the custom vehicles that I did for the Crimson Urban Assault Strike Team. This one was based on a G.I.joe Armadillo tank and was completely taken appart. I started by spraying the body and turret pieces of the tank with Krylon Fusion Satin Burgandy. Then after that had dried, I started to paint the black camouflage and the silver details.


Continued in tomorrow's post.....................

Tuesday, November 17, 2009


Cobra Crimson Guard Urban Assault Strike Team Heavy Battle Tank continued.............


After the satin black camouflage had dried, I painted the rest of the detail applications on th etank. The raised conduit running all over the tank, engine fans and cooling vents, bolts, rivets, tools, etc. were all painted. Then the rest of the stickers went on and it was time to put the tank back together again.


Custom Cobra Crimson Guard Urban Assault Strike Team Heavy Battle Tank "recipe"
Complete Tank - G.I.Joe Mobat (2008 25th Anniversary Target Exclusive Ultimate Battle Pack)
Paints used:
Krylon Fusion Satin Burgandy Spray Paint
Krylon Fusion Satin Black Spray Paint
Krylon Color Creations Satin Black Indoor/Outdoor Paint (#KDQ5105)
Tamiya XF-1 (Flat Black)
Tamiya X-1 (Gloss Black)
Tamiya X-9 (Brown)
Tamiya X-11 (Chrome Silver)


Monday, November 16, 2009


Cobra Crimson Guard Urban Assault Strike Team Heavy Battle Tank continued........


After some of the detail paint apps had dried, I used a soft tip pencil to draw the outlines for the camouflage on the tank. I then used satin black acrylic paint and filled in the camo patterns. This took multiple coats with the black since it's fairly thin. I painted the camouflage with the tank "mocked up" so the pattern would flow the right way and not be off from the other parts.


Then after the black camouflage paint had dried, I applied some Cobra and Crimson Guard logo stickers.


Continued in tomorrow's post.......................

Saturday, November 14, 2009

Cobra Crimson Guard Urban Assault Strike Team Heavy Battle Tank continued.......


After the flat grey primer had dried, I sprayed those parts with Krylon Fusion Satin Burgandy and some with Krylon Fusion Satin Black too. Then, after they the coats had dried, I did some detail paint work on some of the parts and then mocked the main parts of the tank up to decided on the camouflage pattern. I used a pencil and softly drew the desired patterns on the tank so I'd know where to paint the black for the camouflage. Here's some pics:


To be continued in next post............


Thursday, November 12, 2009


Cobra Crimson Guard Urban Assault Strike Team Heavy Battle Tank (U.A.S.T.H.B.T.)


I liked the idea of the Crimson Guard Strike Team and wanted to make some vehicles for them. Before I finished taking this Mobat appart, I had decided to make this a special branch of the Crimson Guard Strike Team and call it the Crimson Guard Urban Assault Strike Team. I had decided the colors would be the Burgandy with Black urban style camoflauge.


For those that aren't aware of what this custom actually looked like before the whole project, here is 2 pics of what the 25th Anniversary G.I.Joe Mobat Tank looks like:


So, after taking it completely appart, I seperated the pieces to show them once taken appart so you get an idea of what's involved.


Then, it was on to the primer. Using Flat Grey Primer spray paint, I coated the main body, underbody, main turret and small turret(turrets are not pictured with primer).


To be continued in tomorrow's post..................................

Wednesday, November 11, 2009


Cobra Viper Officer (Arctic Outfit) continued from yesterday's post.........
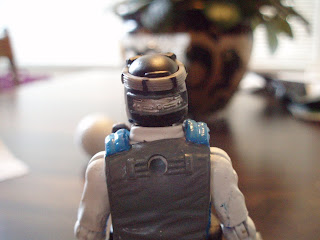
After the flat white paint had dried, it was time to do some detail paint apps. I painted the details on his inner thighs, outter thighs, vest and faceshield with sky blue and also used gold for his lenses on his goggles and flat black for trim on his inner and outter thighs and the belt & some pockets on his vest along with the grenades on his vest. I glued his torso back together and placed a red Cobra symbol sticker from cobrastickers.com on his vest to finish him off.
Custom Cobra Arctic Viper Officer "recipe"
Head/Goggles - Viper Pilot (2008 25th Anniversary Vehicle Set, Wave 3 {Fang/Claw})
Rest of figure - Desert Explosives Trooper (2008 25th Anniversary Internet Exclusive Desert Conditions 7 pack)
Rifle - Viper (2008 25th Anniversary Single Carded Figures, Wave 7)
Paints used:
Flat Grey Primer Spray Paint
Flat white Spray Paint
Tamiya XF-1 (Flat Black)
Tamiya X-11 (Chrome Silver)
Tamiya X-12 (Gold Leaf)
Tamiya X-14 (Sky Blue)