Saturday, October 31, 2009


Copperhead (Arctic Outfit) continued from yesterday's post....................
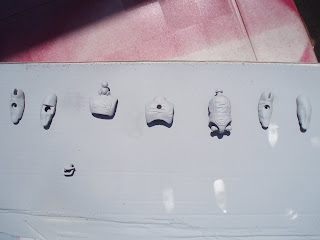
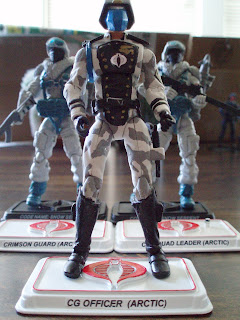
I painted over the Snow Serpent torso and arms and Copperhead legs with German Grey and the "fur" on the shoulders and hands was painted flat black. I did some detail painting to his helmet with silver and flat black as well as on his legs. I glued the torso back together and added some final touchups and the red Cobra symbol sticker to his left arm from cobrastickers.com.
Custom Arctic Copperhead "recipe"
Head, shoulder harness, belt, legs, weapons - Copperhead (2008 25th Anniversary Comic Packs, Wave 4 {Shipwreck/Copperhead})
Torsos, arms, hands, shoulder "fur" - Snow Serpent (2008 25th Anniversary Single Carded Figures, Wave 9)
Paints used:
Tamiya XF-1 (Flat Black)
Tamiya XF-63 (German Grey)
Tamiya X-11 (Chrome Silver)

Friday, October 30, 2009


Copperhead (Arctic Outfit)


Next in my arctic Cobra customs arsenal was Copperhead. After watching the Sunbow G.I.Joe cartoon from the 1980's and seeing Cobra using Killer Whale hovercrafts in the arctic, I thought that Copperhead would be piloting one of those for sure and decided to make this figure.


I started with a 25th Anniversary Snow Serpent and popped his head and webgear off and took his legs off too. I then took a 25th Anniversary comic pack Copperhead and took his head, webgear, rifle and legs off. I popped the Snow Serpent torso appart too for better painting applications. This figure unlike the previous arctic customs did not use any spray paint.


Continued in tomorrow's post.............................

Thursday, October 29, 2009


Crimson Guard Troopers (Arctic Outfits) continued from yesterday's post..................
After the flat white had dried, I added flat red details and painted their shoulder pads grey along with the buttons on their chests and gloved hands. The masks were painted with flat white and trimmed with flat black. The eyepieces were painted silver.
All 3 of the Troopers are the same as far as the paint apps go. Put them all back together and finished off the Arctic Crimson Guard Squad of 5.
Used red Cobra symbol stickers on their chests from cobrastickers.com
Custom Arctic Crimson Guard Troopers "recipe"
Entire Figure - Desert Crimson Guard (2008 25th Anniversary Internet exclusive Extreme Conditions Desert 7 pack)
Paints used:
Flat Grey Primer Spray Paint
Flat White Spray Paint
Tamiya XF-1 (Flat Black)
Tamiya XF-2 (Flat White)
Tamiya XF-7 (Flat Red)
Tamiya XF-66 (Light Grey)
Tamiya X-11 (Chrome Silver)

Wednesday, October 28, 2009


Crimson Guard Troopers (Arctic Outfit)
The last of the Arctic Crimson Guards were 3 Troopers made the same way as the Officer and Squad Leader were. Starting with 3 Desert Crimson Guard troopers, I popped them appart and then sprayed them with flat grey primer. After the primer had dried, they were sprayed with flat white.
Continued in tomorrow's post........................................

Tuesday, October 27, 2009


Crimson Guard Squad Leader (Arctic Outfit) continued from yesterday.............
After the parts were painted with the flat grey primer, they got a coat of flat white spray paint. The mask, chest piece, tops of backpack and detail on cuffs were painted with light grey, the trim around the mask and chest piece as well as the buttons on chest piece and backpack and stripes on the sides of the legs were painted on with flat black. The cuffs were painted with flat red and the emblem on the helmet and eye spot were painted with silver. I glued the torso back together and painted his arm badge flat black and gold, added a red Cobra symbol sticker on his chest and he was finished.
Custom Arctic Crimson Guard Squad Leader "recipe"
Entire Figure - Crimson Guard (2008 25th Anniversary Internet exclusive Extreme Conditions Desert 7 pack)
Paints used:
Flat grey Primer Spray Paint
Flat White Spray Paint
Tamiya XF-1 (Flat Black)
Tamiya XF-7 (Flat Red)
Tamiya XF-66 (Light Grey)
Tamiya X-11 (Chrome Silver)

Monday, October 26, 2009


Crimson Guard Squad Leader (Arctic Outfit)
Next in my army of Arctic Cobra customs was the Crimson Guard Squad Leader. Using the same basis as the arctic Crimson Guard Officer, I used the Internet exclusive Desert Crimson Guard for this custom figure. I used the same colors mostly for the Squad Leader too. The above pics are of the figure popped appart and sprayed with the flat grey primer.
Continued in tomorrow's post........................

Sunday, October 25, 2009


Crimson Guard Officer (Arctic Outfit) continued from yesterday.................
After the flat grey primer was dried, I applied the flat white spray paint and let it dry. Using sky grey, added the camoflauge and painted the mask and ropes hanging from shoulder pad with sky blue. For the chest, shoulder pads, wrist trim, leg stripes, trim around mask on helmet and backpack trim, I used flat black. Also added gold to the helmet, shoulder pads, buttons and medals on chest, arm patch and backpack. Then came time to reassemble him and glue the torso back together. Added a silver Cobra symbol sticker to his chest from cobrastickers.com for the finishing touch.
Custom Arctic Crimson Guard Officer "recipe"
Entire Figure - Crimson Guard (Desert) (2008 25th Anniversary Internet exclusive Extreme Conditions Desert 7-pack)
Paints used:
Flat Grey Primer Spray Paint
Flat White Spray Paint
Tamiya XF-1 (Flat Black)
Tamiya XF-15 (Flat Flesh)
Tamiya XF-19 (Sky Grey)
Tamiya X-11 (Chrome Silver)
Tamiya X-12 (Gold Leaf)
Tamiya X-14 (Sky Blue)

Saturday, October 24, 2009

Crimson Guard Officer (Arctic Outfit)

The 4th arctic Cobra custom figure that I did was a Crimson Guard Officer based on the Desert Conditions Crimson Guard from the Internet exclusive set from 2008. I wrapped the figure in a sock and stuck it inside a bench vise and carefully closed the jaws until the figure popped appart. The sock is used to keep the pieces from flying when the glue pops and also to help protect the figure from getting marked-up from the jaws. Here's what the figure looked like after being popped appart and the lower arms being taken off with the boil-and-pop method.


Next, I applied the flat grey primer spray paint to the majority of the parts.


Continued in tomorrow's post...........................


Friday, October 23, 2009


Cobra Trooper (Arctic Outfit)
The third arctic custom Cobra that I did was this Cobra Trooper. Using the same basis as the previous arctic Cobra Officer and Cobra Commander with the Snake Eyes (arctic) upper/lower torso, hood, bottom of jacket and arms/hands. As with the Cobra Officer's hood, this one had to be dremeled out to allow the helmet to fit properly. I used the head from the Internet exclusive Desert Extreme Cobra 7 pack set Explosives Trooper and repainted the mask flat black. The legs, helmet and knife were from a wave 2 Cobra Trooper.
Custom Arctic Cobra Trooper "recipe"
Head - Desert Explosives Specialist Trooper (2008 25th Anniversary Internet exclusive Extreme Conditions Desert Cobra 7 pack)
Helmet, legs and knife - Cobra Trooper (2007 25th Anniversary Single Carded Figures, Wave 2)
Rest of Figure - Snake eyes (Arctic) (2008 25th Anniversary Single Carded Figures, Wave 8)
Paints used:
Flat Grey Primer Spray Paint
Flat White Spray Paint
Tamiya XF-1 (Flat Balck)
Tamiya X-11 (Chrome Silver)

Thursday, October 22, 2009


Cobra Officer (Arctic Outfit)
The second of my arctic custom Cobras, an Officer. Used the same basis for this as I did with the Arctic Cobra Commander, Snake Eyes (Arctic) upper/lower torso, arms, bottom of jacket and hood. I used wave 1 single carded figure Cobra Officer head, helmet, legs and knife but repainted the mask and knee pads flat black insted of grey. Had to use a dremel and remove some of the plastic on the inside of the back part of Snake Eye's hood to allow the helmet to sit properly on the Officer's head.
Sprayed the Snake Eyes parts with flat grey primer, then after it had dried applied the flat white spray paint. Then used flat black and silver for the buttons, belt and belt buckle. Put him back together again and reglued his torso. Applied a red Cobra symbol sticker from cobrastickers.com to his left arm.
Custom Arctic Cobra Officer "recipe"
Head, Helmet, Legs, Knife - Cobra Officer (2007 25th Anniversary Single Carded Figures, Wave 1)
Rest of Figure - Snake Eyes (Arctic) (2008 25th Anniversary Single Carded Figures, Wave 8)
Paints used:
Flat grey Primer Spray Paint
Flat White Spray Paint
Tamiya XF-1 (Flat Black)
Tamiya X-11 (Chrome Silver)

Wednesday, October 21, 2009


Cobra Commander (Arctic Outfit)

Another custom for my Cobra Arctic Squads, this time it's Cobra Commander!

I started with the arctic Snake Eyes figure from the 25th Anniversary Collection, Wave 8 and popped him completely appart. Using the upper and lower torsos, bottom of jacket, hood and arms/hands from the Snake Eyes along with the legs, gun and heads from Cobra Commander figures, I started this custom. I sprayed the Snake Eyes parts with grey primer first, then flat white for the color. I then added details with flat black and silver for the buttons, belt buckle and belt. His gloves were painted flat black as well and used a red Cobra symbol sticker from cobrastickers.com for his left arm. Once the parts were all painted and dried, it was time to put him back together and re-glue his torso.

Custom Arctic Cobra Commander "recipe"

Head #1 - Cobra Commander (Hooded) (2008 25th Anniversary Comic Packs, Wave 5 {Tripwire/Cobra Commander})
Head #2 - Cobra Commander (Chrome Battle Mask) (2008 25th Anniversary Target exclusive Ultimate Battle Pack)
Upper/Lower Torso, Hood, Arms, Hands, Bottom of Jacket - Snake Eyes (Arctic) (2008 25th Anniversary Single Carded Figures, Wave 8)
Legs/Feet and Gun - Cobra Commander (2008 25th Anniversary Target exclusive Ultimate Battle Pack)

Paints used:
Flat Grey Primer Spray Paint
Flat white Spray Paint
Tamiya XF-1 (Flat Black)
Tamiya X-11 (Chrome Silver)

Tuesday, October 20, 2009


Chrome Stormtrooper from Star Wars Japan Convention
I saw the top picture while surfing the web and decided to make a custom figure based on this statue. I started with a 2007 Star Wars 30th Anniversary Saga Legends Sandtrooper. I painted the entire figure with silver acrylic paint. Then used gold for his belt, details on his head and knee. Then painted his eyes green to match the statue and used black and red Sharpie markers for the japanese writing on his shoulder pauldron.
Custom Japan Star Wars Convention Chrome Stormtrooper "recipe"
Entire Figure - Imperial Sandtrooper (2007 Star Wars 30th Anniversary Saga Legends)
Paints used:
Tamiya X-11 (Chrome Silver)
Tamiya X-12 (Gold Leaf)
Tamiya X-28 (Park Green)

Monday, October 19, 2009


Dreadnok Raizuur
I did this custom for a contest on another site for creating a new Dreadnok or updating an existing one. I decided to create a new Dreadnok for this one and wrote up a little backstory for him too. Here's my background story for him:

"Growing up in a white-collar family in a fancy private gated community really had an adverse effect on young Rasputin V. Putin. His father Vladimir, was a former Russian K.G.B. agent until he and his wife Ivanna, a former stripper/prostitute, defected to the United States in 1981. Vladimir quickly got a very good paying job working for the Springfield Toasty Bakery, a government front that was spying on the recent activities of the terrorist organization known as Cobra.
After graduating from Springfield Prep Institute (a very ritzy and rich private school), young Rasputin started to lash out against any and all authority figures. One night while his parents were sleeping, Rasputin cut the brake lines on his dad's new Rolls Royce. The next morning Mr. & Mrs. Putin loaded up their beloved Rolls with luggage for a "vacation" they were going on (paid for by the government) to Langly, Virginia. While driving to the airport, they came up to a railroad crossing while the train was coming through and couldn't stop due to their son sabotaging the brakes the night before. Once word got out about his parents deaths, he was under immediate investigation by the C.I.A. and F.B.I.
Now on the run from the law, Rasputin took off for the swamps to hide. That night while he was grilling some muskrats he had killed, a group of strange men and a woman appeared and knocked him out. When Rasputin came to, he was surrounded by what he thought was a biker gang like the Hells Angels. What he was in the middle of turned out to be much worse. The man who seemed to be the leader of the gang introduced himself as Zartan. His brother Zandar, sister Zarana and the rest of the gang, Buzzer, Torch, Ripper, Thrasher, Monkeywrench & Zanzibar. They were known as the Dreadnoks and were mercinaries for Cobra.
After being initiated into the Dreadnok gang, Rasputin took the code name of Raizuur (pronounced Ra-zor) because of his love of sharp objects and he was mentored by Ripper. Raizuur dyed his hair bright blue and wore it in a mohawk with a pony tail, tattooed barb-wire around his head and collected the skulls of the muskrats he had killed his first night in the swamp and wore them as a necklace."
I sculpted his mohawk and pony tail out of greenstuff and then painted it bright blue.
I cut out spots on his vest to resemble rips in it and detail painted the vest after that.

I also had to carefully scrape the US Marine logo "tattoo" that is on Gung-Ho's chest off using the tip of an Xacto knife.


Since Dreadnok Ripper was his mentor, he used the same type of rifle as Ripper.....
(and I added details to it)


Custom Dreadnok Raizuur "recipe"
Head - Basso (2008 Star Wars 30th Anniversary Comic Pack {Mouse and Basso in Stormtrooper disguise})
Rest of figure - Gung-Ho (2007 25th Anniversary G.I.Joe Box Set)
Skull Necklace - Snake Eyes (2008 25th Anniversary Single Carded Figures, Wave 8)
Axe - Storm Shadow (2009 25th Anniversary Comic Packs, Wave 8 {Resolute Storm Shadow/Tunnel Rat})
Rifle - Ripper (2008 25th Anniversary Single Carded Figures, Wave 12)
Hair- Greenstuff
Paints used:
Tamiya XF-1 (Flat Black)
Tamiya XF-8 (Flat Blue)
Tamiya XF-7 (Flat Red)
Tamiya XF-10 (Flat Brown)
Tamiya XF-19 (Sky Grey)
Tamiya X-11 (Chrome Silver)
Tamiya X-14 (Sky Blue)


Saturday, October 17, 2009


Cobra Night Vulture
I came accross the original Cobra Night Vulture from 1991 and decided he most likely won't be getting an updated figure anytime soon so why not make a 25th Anniversary stle updated custom of him. Using the Snake Eyes figure from the 2007 25th Anniversary G.I.Joe Box Set, I began the transformation from Snake Eyes to Cobra Night Vulture. Took all of his gear off and set it aside. I completely repainted the upper/lower torso, arms and upper legs with purple like the original Night Vulture. The head was painted black, goggles purple with red lense and the goggle strap grey. Painted the red and black details on his arms and upper legs. Used H.I.S.S. Driver lower legs on him and painted his webgear black with red accents. Gave him Scarlett's crossbow gun since that was the only weapon the original version of Night Vulture came with.
Custome Cobra Night Vulture "recipe"
Entire Figure minus lower legs - Snake Eyes (2007 25th Anniversary G.I.Joe Box Set)
Lower Legs - H.I.S.S. Driver (2008 25th Anniversary Single Carded Figures, Wave 7)
Crossbow Gun - Scarlet (2007 25th Anniversary G.I.Joe Box Set)
Paints used:
Tamiya X-1 (Gloss Black)
Tamiya X-7 (Gloss Red)
Tamiya X-16 (Purple)
Tamiya XF-19 (Sky Grey)

Friday, October 16, 2009


Iron Grenadiers Mako Shark continued from yesterday.........
After the metallic gold spray paint dried, I used flat black paint to add detail to the rudders, cannons, cannon doors, torpedos, engine cover, engine intake and exhaust pieces.


To get the Iron Grenadier look even closer to the original style from the 1980's vehicles, I used clear red paint and applied multiple layers to the inside of the canopy. By doing this it "tinted" the canopy red and is still see through just like the original Iron Grenadier vehicles. This clear paint is thicker than regular acrylic paints though and is sticky as well. Since it's a tinted clear paint, it took multiple coats to cover evenly.


After the clear red had dried, I applied flat black to the outter edges and trim of the canopy to finish it off.
After re-assembling the vehicle, stickers were applied. I printed some of them out and the others came from Hasbro sets from the Sharc Tooth and Night Specter. I also added gold Destro Iron Grenadiers logos from cobrastickers.com (not pictured).
Custom Iron Grenadiers Mako Shark "recipe"
Entire Vehicle - G.I.Joe Sharc Tooth (2008 25th Anniversary Vehicle Set, Wave 2)
Paints used:
Krylon Fusion Satin Black Spray Paint
Rustoleum Metallic Gold Spray Paint
Tamiya XF-1 (Flat Black)
Tamiya X-12 (Gold Leaf)
Tamiya X-27 (Clear Red)